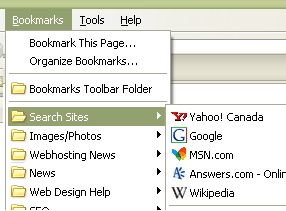
Notice the “G” symbol that appears in the address bar? That’s Google’s favicon. Favicons are also called “bookmark icons” as they also appear in your browser’s Bookmark/Favorites menu.

Favicons can:
- increase brand imaging of your website
- help your website stand out graphically in a long list of bookmarks
To add a favicon to your website, you will need to create a favicon.ico file and upload it to the main directory on your server.
Let’s Begin – Creating a Favicon
A favicon should be 16 X 16 pixels with 16 colors, and the file name should be favicon.ico.
Because 16 X 16 is such as small area, it is easier to start your project with a 64 X 64 area. Once you have completed your design, reduce it to 16 X 16 to see if it looks good. Try to keep the design and colors simple, and keep tweaking it until it is perfect.
You can use an image editor, such as Adobe Photoshop or Adobe Illustrator, to create your favicon. You can also check out some of the favicon creators available on the Internet (ie. FavIcon from Pics, Favicon.com’s online creator, and IconMaster).
Saving the Favicon.ico File
Once you are satisfy with your favicon, save it as “favicon.ico”.
Uploading it to your website
Connect to your FTP account and upload your Favicon.ico file to your server. You must place the file in the same directory as your index.htm/html page.
If you upload it into your images directory, you will need to include a direct link to the favicon.com file in the
tag of your HTML source code.For example, <link rel=Shortcut Icon href=/foldername/favicon.ico>
Note: The favicon.ico is by no means essential to your website's operation. Few people even notice its existence, and 16X16 is really too small to put anything useful in it. However, creating such an icon adds to the professionalism of your site.
